Your articles are available on the page Articles, accessible via the top sidebar of your Stylo account:

At the top of this page, there are a number of functions:
- Create a new article;
- Create and manage tags, filter articles through them;
- Search for an article via its chosen name on Stylo.
Creating and editing articles #
To create an article, simply click on the black “Create article” button on the left-hand side of your personal space. A dialog box will open, asking you to give your article a title. You also have the option of assigning Tags to your article, and to have it belong to other Workspaces than your own personal one.
To start editing it, simply click on the button  on the right.
In your personal workspace, your articles will be displayed one after the other according to the most recent modifications.
You can rename your articles or assign tags to them a posteriori, attach them to another workspace by clicking on “Edit”, accessible through the “three-dot menu”  .
.
Please note, by default, an initial “How to Stylo” article is available on the platform, detailing each stage in the writing of an article. Feel free to refer to it.
Create tags #
From your personal space, you can create tags and assign them to your articles. You can also search for articles by tag. Once created, they appear at the top of your personal space. You can select them and the corresponding articles will be displayed.
To do this, click on the Add tags button  at the top left of your personal space.
A dialog box will open, asking you to give your tag a name and a description. You can also choose its color.
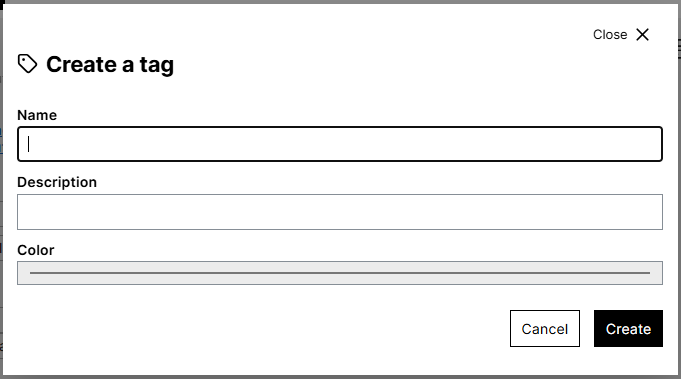
By clicking the “Create” button, your label will now be available and you can assign it to the items that correspond to it.
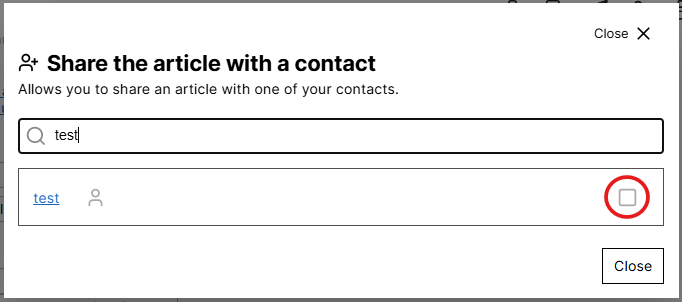
Share an article #
You can share your article with other Stylo users by clicking on the following icon:

To share, you need to enter the email address of the Stylo user: this is the email address with which the user created their Stylo account. Once you’ve entered the address, you need to add it by clicking on the checkbox.
You also have the option to send a copy of your article to another Stylo user by clicking on the [Send a copy] option in the three-dot icon. In this case, only the latest version of the article will be visible to the recipient, with future changes not visible. Indeed, in the process, a new copy is created: the users each work on their own document.
Preview an article #
It is possible to preview the Stylo article in HTML with a default layout.
To have the preview, click on the “preview” switch just above your article, in the editor.

Duplicate an article #
From your personal space or workspaces, you can duplicate an article by clicking on the option “Duplicate” via the three-dot icon.
A duplicate article will then be generated and will appear at the top of the list on your Stylo articles page. This article will automatically be entitled: [Copy]Article title . This duplicate is created from the current (most recent) version of the article and has no version history.
Copy an article ID #
To copy the ID of an article, simply click on the corresponding option via the three-dot icon.
Delete an article #
To delete an article, click on “Delete” via the three-dot icon.
A dialog box will open to ensure that this is the action you wish to perform, click on “Confirm” if it is the case.
Warning: deleting an article is irreversible. However, if the article is shared with another user, even after deletion, it will remain accessible to that user.