Stylo GraphQL API - An introduction #
Stylo includes a GraphQL API that users can read and write.
The API provides access to Stylo data via the GraphQL query language. From the endpoint https://stylo.huma-num.fr/graphql, you can connect Stylo to a whole range of customized functionalities. For example, the API allows you to retrieve your articles and integrate them into your favorite static site generator.
GraphQL stands for Graph Query Language. It’s a query language and runtime environment for application programming interfaces (APIs). It was first created by Facebook in 2012, and released as open source in 2015. You get only the data you need from your queries, and you define their structure.
Why use GraphQL? #
- This environment is very easy to use ;
- It lets you visualize and manipulate your data in Stylo ;
- You get exactly what you ask for, and no more ;
- You can have several types of data in a single request ;
- It’s fast ;
- You don’t need programing skills to use this environment;
- The available requests are listed in the API’s documentation (“Schema” or “Doc”).
Before you start #
- Installing a GraphQL client
You can choose your preferred client, be it GraphQL Playground, Altair or other. The following demonstration uses the GraphQL Playground client.
- Enter URL
Once you’ve installed the extension or environment, make sure you enter the URL in the field provided above, i.e. https://stylo.huma-num.fr/graphql. This is the API endpoint.
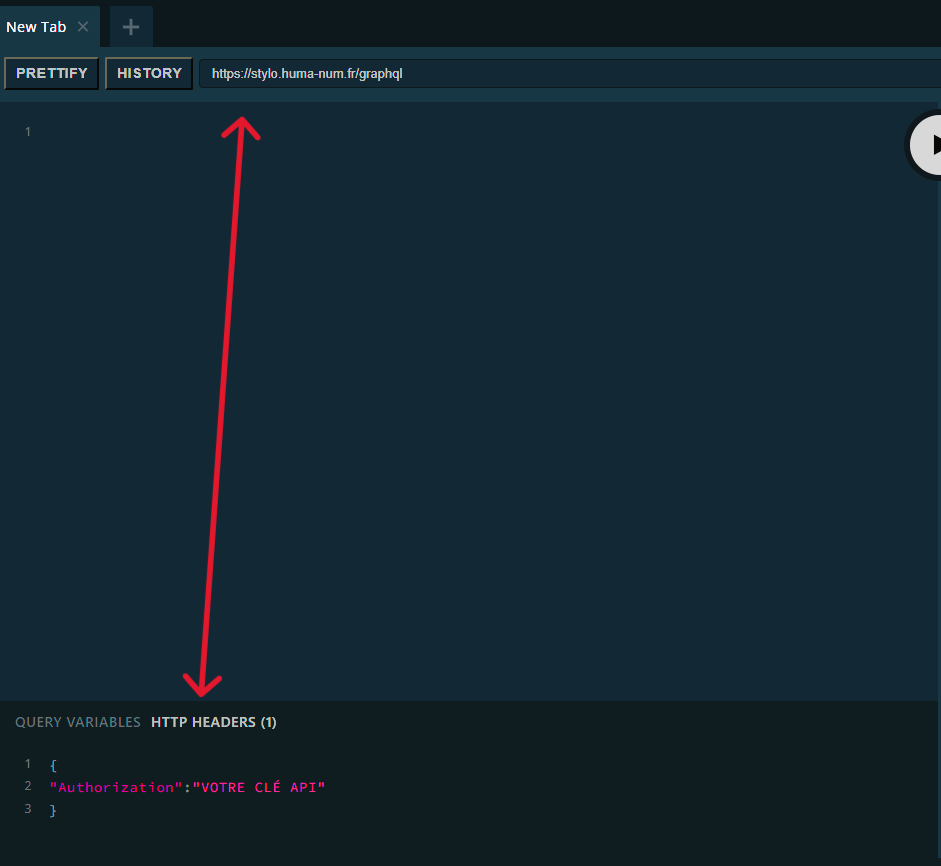
- API key
You also need to enter your API key. In the Stylo application, click on your name, the drop-down menu will open and then you click on your e-mail address. This will take you to your account information. This is where you’ll find your key. Copy it. Back in GraphQL, on the bottom left is the “HTTP HEADERS” tab. Enter the key as follows:
{
“Authorization": "YOUR API KEY"
}
Make sure you are in the “HTTP HEADERS” tab.
Now you’re ready to enter your first query!
Getting started #
In this introduction to Stylo’s GraphQL API, we’ll look at how to use queries and mutations. Queries allow you to visualize the data available in Stylo, while mutations allow you to manipulate, create or delete data.
Queries #
Simply request a query. This is the first word in your request. In the first example, we’re asking for a list of all your items contained in Stylo. In square brackets, we specify what other information we’d like to have. In this case, we’d like to know the associated user, the title of the article and its identifier.
You can, of course, request other information as well. The possibilities are vast, and they go hand in hand with your own needs. Don’t forget to close the brackets after opening each one. When you’re ready, click the execute button.
Example 1:
query allMyArticles {
    user {
     _id
     email

     articles {
      _id
      title
      }
   }
}
In example 2, you need to enter the identifier of one of the items in the previous list. Keep it, as you’ll need it for the last example too. Once you’ve entered the query, you should see the title of your article, as well as the person who owns it.
Example 2:
query articles {
    article(article: “ARTICLE ID”){
    title
       owner {
    displayName
    username
    email
    }
}
}
For this thrid example, once again, you need to enter your article ID in the appropriate space. This time, GraphQL shows you not only the title of your article and the contributors, but also the Markdown, Yaml and BibTex it contains!
Example 3 :
query {
    article(article: “ARTICLE ID”){
    title
    contributors{user{displayName}}
    workingVersion{md yaml bib}
    }
}
One last example for the road, which may be useful in the context of Stylo data and its organization by “corpora”: a query to obtain the names of all the articles in a corpus, with their ids and the latest versions of their content. You can obtain the ID of a corpus on its “preview” URL, on the Stylo app.
Exemple 4 :
query articlesCorpus {
  corpus(filter:{corpusId: " ID OF THE CORPUS "}){
    articles{
      article{
        title
        _id
        workingVersion{md}
      }
    }
  }
  }
You may have noticed that the application offers you autocompletion options when you write. This gives you examples of what you can ask for later.
You’ll also find a complete list in the tab on the left-hand side of the “Schema” screen, or in some versions “Doc”. If you click on it, the tab opens. The API documentation tab is a very interesting feature of GraphQL Playground. It lets you preview all possible queries and mutations, along with their details, in a single field of a given schema.

You can find the complete GraphQL schema for Stylo [on this JavaScript file]](https://github.com/EcrituresNumeriques/stylo/blob/master/graphql/schema.js).
Mutation #
In addition to queries, you can also perform mutations via GraphQL. What are mutations? Mutations are another form of request. However, all operations that cause “write” changes must be sent explicitly via a mutation. To put it simply, while queries allow you to view your data, mutations are used to create, modify or delete data or content.
Let’s take a look at the list in the “Schema” tab: 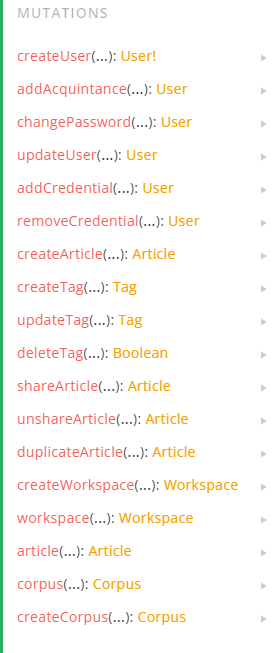
You can create articles, share your articles, duplicate them and much more. The list goes on and on.
Let’s look at an example of a mutation:
mutation{createArticle(title: “ARTICLE TITLE”,
    user: “YOUR ID”)
    {title _id}}
In this example, we’re asking the API to create an article for us. To do this, enter your ID number, which you’ll find either in your Stylo account information, or which you can request in GraphQL Playground. Then enter the title you want in the appropriate space. Once the mutation has been launched, return to Stylo’s “Articles” page and you’ll see your new article with the chosen title.
In conclusion #
GraphQL Playground is like a sandbox, an integrated development environment (IDE) where you can create scripts in any language. These scripts integrate GraphQL queries to automate certain tasks: for example, we could imagine a local backup of Stylo data!
As you can see, Stylo’s GraphQL API is easy to use. All you have to do is enter the name of the data you want, or the mutations you want, and the application will give them to you/make them for you. That’s all there is to it, and all that’s left is for you to try out different queries and mutations for yourself!